
✦ Preface | I Don’t Know Shaders—But I Know When It Needs to “Feel Right”
From the start, I never intended to make purely decorative effects.
What I wanted was for players to instantly feel what the character was doing with every action.
I’ve never formally learned shaders. This was my first time touching URP as well. My approach was simply:
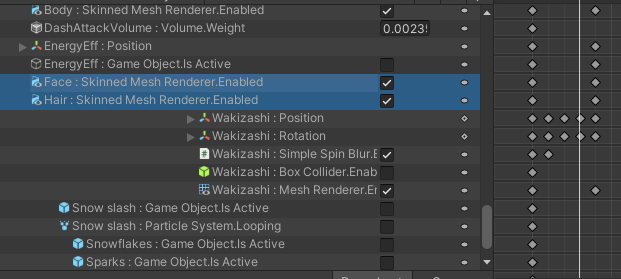
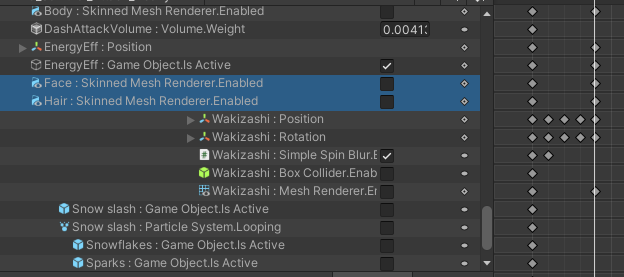
- Watching how the values in the inspector changed,
- Keyframing animation frame by frame,
- And experimenting with whatever tools I had on hand, cobbling things together through trial and error.
So the whole dash attack sequence is built on a set of “unconventional,” but practical, techniques.
✦ Starting Out: The Character Instantly Disappears
When the Dash begins, I didn’t just want to stretch out an animation—I wanted the whole character to vanish.
I created a float parameter called _Alpha in the shader graph and used the Animator to control this value.
When the character disappears, the scene naturally enters an “unexpected” moment of empty space—a brief pause that hints at what’s coming next.
It wasn’t about making things flashy, but rather creating the illusion of a real, sudden dodge—breaking the usual rhythm and making the player subconsciously tense up.
✦ Fisheye with URP: Creating Momentum Visually (Not with Sound)
When the dash starts, I added a fisheye squeeze effect to the center of the screen using URP’s post-processing volume.
This wasn’t a visual gimmick—it was about “tightening the space” to signal: “Now comes a fast movement.”
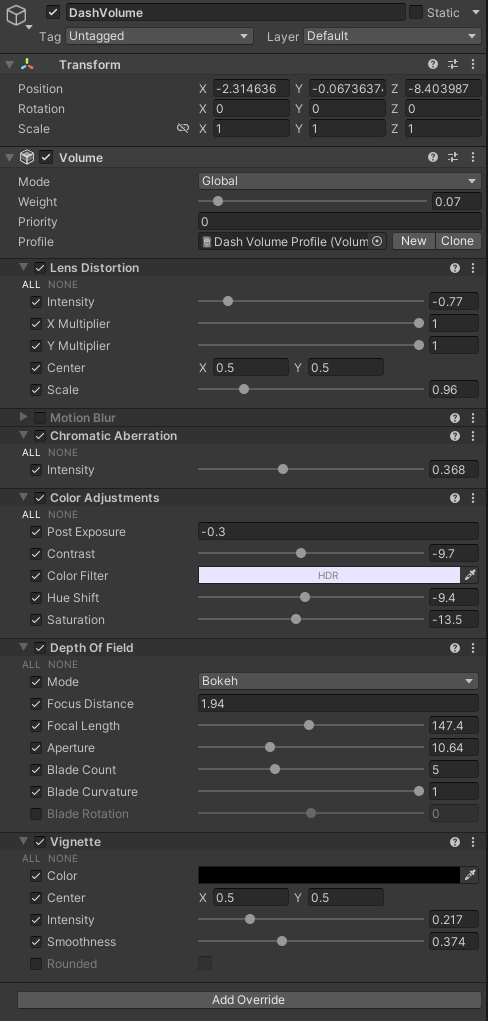
URP Volume settings screenshot
The effect is: “character disappears → screen compresses → camera zooms in”—a transition from stillness to motion.
✦ Reappear & Attack: Sudden Entrance + Camera Closes In
The end of the dash isn’t at the starting point—it’s in front of the enemy.
At the moment the character reappears, I swapped in a different shader with a glowing edge, as if a flash of light bursts out, and the screen shakes slightly.
For the camera, I didn’t use a binding method to lock it to the character. Instead, I wrote a script that constantly calculates the character’s position and uses slerp to move towards it.
So when the character teleports in front of the enemy, the camera doesn’t just hard cut—instead, it slides smoothly to the new target, making it feel like you’re right behind the character, delivering the hit.
Vector3 targetPosition = Vector3.Lerp(transform.position, targetTransform.position, delta / followSpeed);
transform.position = targetPosition;
“I didn’t use a binding method to lock the camera, but scripted it to constantly track the character’s position and slerp over.”
This approach is built into the entire camera system as “calculated tracking”—the dash just causes the camera to slide naturally to a new spot, creating a bonus effect: the camera smoothly sticks back to the character.
✦ Finale: Resetting Everything, Letting the Rhythm Calm Down
Finale: Resetting Everything, Letting the Rhythm Calm Down
After the attack, all shader and volume effects are removed, the character returns to an idle pose, and the scene becomes still—no extra movement.
This calm isn’t any technical trick; it’s about bringing the rhythm down, letting the player know: “The move’s finished, it’s your turn now.”
✦ Development Process: Iterative Experimentation
The entire flow didn’t use Timeline or any fancy VFX tools. I simply:
- Used the Animator to control material float values;
- Used shader dissolve for the death effect, slowly fading the character out;
- Managed all shader states with a custom material controller script;
- Implemented transparency, flashing, and dissolve just by swapping shaders/controlling values.
public Material[] PlayerNormalMaterialList;
public Material[] AttackHairMaterialList;
public Material[] AttackSwordMaterialList;
public Material[] PlayerHairNorMaterialList;
public Material[] SwordNorMaterialList;
To avoid hardcoding during implementation, I used a separate material for each state. This way, switching effects just takes a single line, and future tweaks are easy.
PlayerBody.materials = AttacMaterialList;
PlayerHair.materials = AttackHairMaterialList;
swordMesh.materials = AttackSwordMaterialList;
This allowed me to achieve all the shader transitions for attack animations without writing shader code—just by swapping pre-set materials at the right moments.
I didn’t have a complete VFX pipeline. Everything came from experimentation, observation, breaking things down, and putting them back together.
✦ My Effects Aren’t Design—They’re About Making the Action Feel Right
I don’t really see myself as doing “visual design”—what I’m actually doing is deconstructing the feel of the action on screen.
For example:
- Start → character vanishes (stillness + squeeze)
- Reappear → attack (entrance + camera zoom + FX)
- End → reset (scene goes still)
Each part is something I tried out by feel, always asking myself: “Does this bit feel right? Is it clear enough?”
✦ Closing: It’s Not About Looking Cool—It’s About Showing Exactly What the Character’s Doing
This dash combo definitely isn’t industry-standard VFX. It’s something I figured out, step by step, by picturing it in my head.
I don’t know how to write shaders, but I know how to make things make sense;
I don’t have an artistic sense, but I know when there needs to be a “key moment” on screen;
I don’t rely on prebuilt tools—I build up the rhythm step by step.
If you’re a beginner, a solo dev, or just unfamiliar with shaders—but you have a vision, intuition, and imagination—
you can absolutely create your own sense of impact too.
This post builds on the main RPG development log.
For the full story and system overview, read the main post here:
→ RPG Battle System Devlog